
102. Lecke

Merci pour Traduction


Szinek

Filterek
Mehdi
Simple
Caroline & Sensibility
DSB Flux
Mock
AFS Import
AAA Frames
Penta.com
L & K - Zitah
WM Extravaganza
WM Extravaganza
AP Lines

Nyiss egy 900 x 500 - as üres lapot
--- Mehdi - Wavy Lab 1.1
--- Mehdi - Wavy Lab 1.1

Effects - Image Effects - Seamless Tiling

Adjust - Blur - Gaussian Blur - 50
--- Mehdi - Sorting Tiles

Effects - Edge - Enhance more
Layer - Duplicate
A felső rétegnek be csukod a szemét
Vissza lépsz a "Raster 1"-re
--- Mehdi - Weaver

Adjust - Sharpness - Sharpen more
Fel lépsz a felső rétegre , ki nyitod a szemet
--- Simple - Top Left Mirror
Blend mode - Lighten , Opacity - 50 %
Layer - Merge Down
Adjust - Sharpness - Sharpen
Selection Tool - Custom Selection

Promote Selection - To Layer
Selection - None
Adjust - Blur - Blur more
--- Caroline & Sensibility - CS_LDots

--- DSB Flux - Linear Transmission

Adjust - Sharpness - Sharpen more
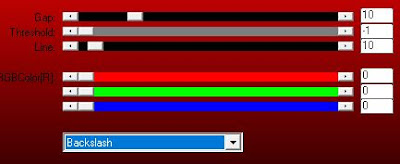
Effects - 3 D Effects - Drop Shadow - 5, 5 , 80 , 15
Most igy állsz

Le lépsz a Raster 1-re
Selection Tool - Custom Selection

Promote Selection - To Layer
Adjust Blur - Gaussian Blur - 25
--- Mock - Windo...

--- AFS Import - sqborder 2

Selection - Modify - Contact - 55
--- AAA Frames - Foto Frame

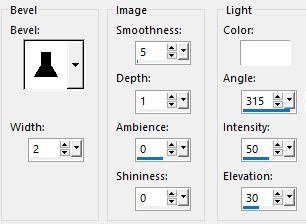
Effects - 3 D Effects - Inner Bevel
Layer - New Raster Layer
Tölssd ki a -- #dbe5b0 szinnel
Effects - 3 D Effects - Drop Shadow - 5, 5 , 80 , 35
Selection - None
Vissza lépsz a "Promoted Selection 2 "-es rétegre
Adjust - Blur - Blur
--- Penta.com - color dot

Fel lépsz a felső rétegre
Hozzd be a mappából a "gomb"-ot
Másold be a képedre
Effects - Image Effects - Offset

Layer - Merge Down -- 2-szer
Image - Resize - 80 % , csak ezt a réteget
Effects - Image Effects - Offset

Layer - Duplicate
Image - Mirror - Horizontal
Layer - Merge Down
Vissza lépsz a Raster 1- re
--- L & K - Zitah

Most igy állsz

Lépj a "Promoted Selection 1 "-re
Selection Tool - Custom Selection

Promote Selection - To Layer
Adjust - Blur - Blur
Selection - None
Layer - Arrange - Move UP
---WM Extravaganza - Holiday in Egypt

Blend mode - Hard Light
--- AP Lines - SilverLining
Hozzd be a mappábol az "irás"-t
Másold be a képedre
Effects - Image Effects - Offset

Effects - 3 D Effects - Drop Shadow - 1, 1 , 100 , 1
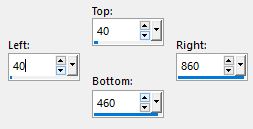
Image - Add Borders - 1 pixel -- #dbe5b0
Image - Add Borders - 75 pixel -- #bac55d
Jelöld ki a varázspálcával
--- Simple - Quick Tile
Adjust - Blur - Gaussian Blur - 25
Selection - Modify - Select Selection Borders

--- AP Lines - SilverLining

Effects - 3 D Effects - Drop Shadow - 5, 5 , 50 , 35
Adjust - Sharpness - Sharpen more
Selection - None
Hozzd be a mappából a "keret"-et
Másold be a képedre
Adjust - Sharpness - Sharpen more
Effects - 3 D Effects - Drop Shadow - 5, 5 , 80 , 45
Hozzd be a mappából a "nöi" tubét
Másold be a képedre
Helyezzd el ahogy a képen látható
Adjust - Sharpness - Sharpen more
Effects - 3 D Effects - Drop Shadow - 5, -25 , 80 , 45
Layers - Merge All
Kész a képed !!!
Köszönöm a figyelmet
Jacqueline
Mimi
Garances

Adjust - Blur - Gaussian Blur - 50
--- Mehdi - Sorting Tiles

Effects - Edge - Enhance more
Layer - Duplicate
A felső rétegnek be csukod a szemét
Vissza lépsz a "Raster 1"-re
--- Mehdi - Weaver

Adjust - Sharpness - Sharpen more
Fel lépsz a felső rétegre , ki nyitod a szemet
--- Simple - Top Left Mirror
Blend mode - Lighten , Opacity - 50 %
Layer - Merge Down
Adjust - Sharpness - Sharpen
Selection Tool - Custom Selection

Promote Selection - To Layer
Selection - None
Adjust - Blur - Blur more
--- Caroline & Sensibility - CS_LDots

--- DSB Flux - Linear Transmission

Adjust - Sharpness - Sharpen more
Effects - 3 D Effects - Drop Shadow - 5, 5 , 80 , 15
Most igy állsz

Le lépsz a Raster 1-re
Selection Tool - Custom Selection
Promote Selection - To Layer
Adjust Blur - Gaussian Blur - 25
--- Mock - Windo...

--- AFS Import - sqborder 2

Selection - Modify - Contact - 55
--- AAA Frames - Foto Frame

Effects - 3 D Effects - Inner Bevel

Selection - None
Blend mode - Luminance ( Legacy )
Effects - 3 D Effects - Drop Shadow - 5, 5 , 80 , 35
Image - Resize - 95 % , csak ezt a réteget
Most igy állsz

Le lépsz a "Raster 1"-re
Be hozzod a mappából a "sel"
Jelöld ki a varázs pálcával a fehér részeket
Selection - Save Selection - To Alpha Channel
Selection - Load Selection - From Alpha Channel

Promote Selection - To Layer
Layer - Arrange - Bring To Top
Selection - Modify - Contact - 30
Layer - New Raster Layer
Tölssd ki a -- #dbe5b0 szinnel
Effects - 3 D Effects - Drop Shadow - 5, 5 , 80 , 35
Selection - None
Vissza lépsz a "Promoted Selection 2 "-es rétegre
Adjust - Blur - Blur
--- Penta.com - color dot

Fel lépsz a felső rétegre
Hozzd be a mappából a "gomb"-ot
Másold be a képedre
Effects - Image Effects - Offset

Layer - Merge Down -- 2-szer
Image - Resize - 80 % , csak ezt a réteget
Effects - Image Effects - Offset

Layer - Duplicate
Image - Mirror - Horizontal
Layer - Merge Down
Vissza lépsz a Raster 1- re
--- L & K - Zitah

Most igy állsz

Lépj a "Promoted Selection 1 "-re
Selection Tool - Custom Selection

Promote Selection - To Layer
Adjust - Blur - Blur
Selection - None
Layer - Arrange - Move UP
---WM Extravaganza - Holiday in Egypt

Blend mode - Hard Light
--- AP Lines - SilverLining

Hozzd be a mappábol az "irás"-t
Másold be a képedre
Effects - Image Effects - Offset

Effects - 3 D Effects - Drop Shadow - 1, 1 , 100 , 1
Image - Add Borders - 1 pixel -- #dbe5b0
Image - Add Borders - 75 pixel -- #bac55d
Jelöld ki a varázspálcával
--- Simple - Quick Tile
Adjust - Blur - Gaussian Blur - 25
Selection - Modify - Select Selection Borders

--- AP Lines - SilverLining

Effects - 3 D Effects - Drop Shadow - 5, 5 , 50 , 35
Adjust - Sharpness - Sharpen more
Selection - None
Hozzd be a mappából a "keret"-et
Másold be a képedre
Adjust - Sharpness - Sharpen more
Effects - 3 D Effects - Drop Shadow - 5, 5 , 80 , 45
Hozzd be a mappából a "nöi" tubét
Másold be a képedre
Helyezzd el ahogy a képen látható
Adjust - Sharpness - Sharpen more
Effects - 3 D Effects - Drop Shadow - 5, -25 , 80 , 45
Layers - Merge All
Kész a képed !!!
Köszönöm a figyelmet
Szerkesztők akik el készitették a tutoriált. Köszönöm szépen
Animabelle


Jacqueline


Mimi


Garances


Mónica Torrejón


Lisette (moonlightangel )


MamieVal


Jeanne van den Eijnden


Adri


Gigí Galván


Emi


Henny S


Nena Silva
